

Paxton Net2 Adding a New User
Paxton


'Users' refers to the people that use the access control system. Users are identified to the system by a card, token or PIN (or a combination of any of these). Once a user has been identified to the system, a decision can be made at each door whether they are permitted or denied access.
Every user that has been entered onto the system has a user record. This contains information regarding their access permissions, cards/tokens, PIN's and any other details required.
The users on the system are displayed in the main window. If departments have been configured then these will also be displayed.
To set up departments please refer to -: AN1041 - Using Departments < http://paxton.info/851 > - Adding a new user
Adding users can be done in several ways:
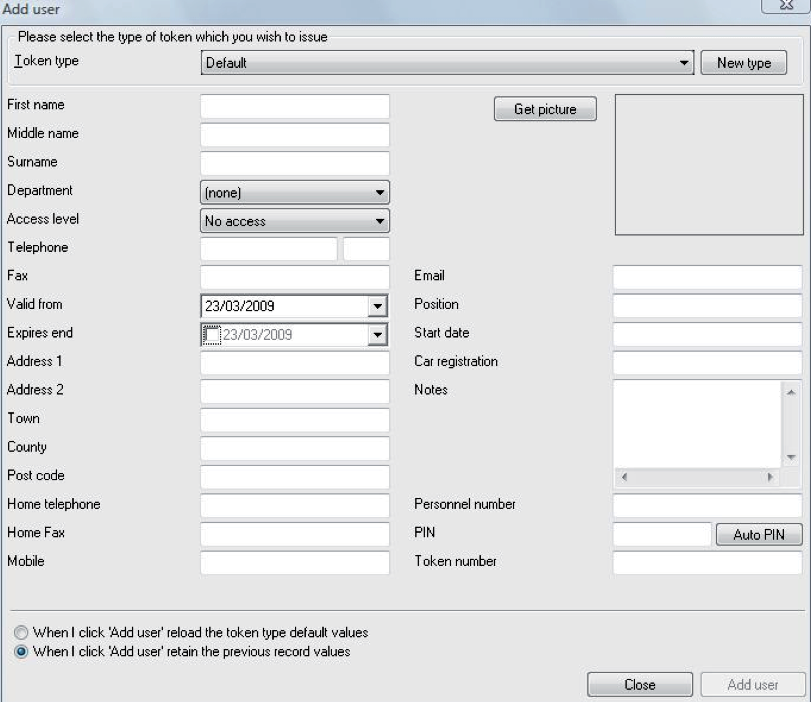
You can enter as much information as you like through this form. The users name must always be entered. When completed, click 'Add user.' This will save the record and clear the fields for the next user's details to be entered. Clicking 'Close' will close the form and go to the last user record entered.
By setting up a token type, fields can be automatically completed for different groups. (e.g. Visitors) For further details on how to set up Token Types refer to -: AN1042 - Using Token Types < http://paxton.info/859 >
The 'Expires end' date is inactive as default. If required it can be marked as active and a date can be selected from the drop down calendar.
The user can be barred from all doors by pressing the 'Bar user' button.
A user's complete record can be deleted by pressing the 'Delete record' button. This will completely remove the user record from the database. - WARNING. This action cannot be undone.
A picture can be imported by pressing the 'Get picture' button. Bmp, jpg, gif, wmf and emf formats are supported. Pictures can be deleted by pressing the 'Delete picture' button.
* Capture Picture.
If a webcam has been installed on the PC a 'Capture Picture' button is displayed on the user records screen.
This can be used to import a live user picture into the database. To set up the web cam refer to -: AN1092 - Integrating a web cam for use with Net2 user records < http://paxton.info/855 >
- Print card
Clicking on 'Print card' will print the card for the user being displayed. To set up card printing refer to -: AN1034 - Net2 Card Printing < http://paxton.info/56 >
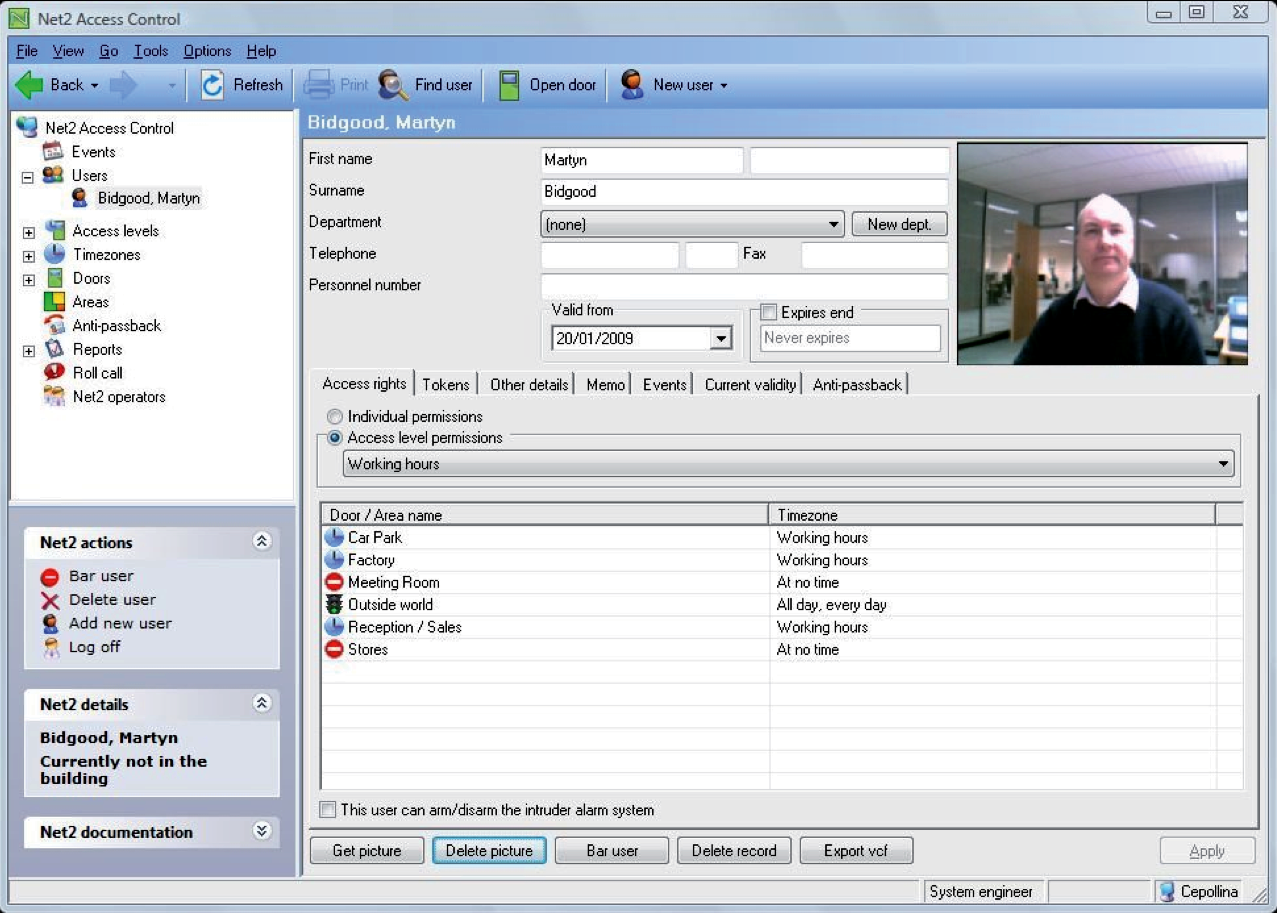
Individual permissions. This option should only be used for Emergency/Test situations where a normal access level would take time to create and assign. Their use should be kept to a minimum. Individual permission levels do NOT show in the 'Access levels' tree view and are therefore much more difficult to trace and control.
When Net2 has been set up with 'Intruder alarm integration' enabled, a tick box labelled "This user can arm/ disarm the intruder alarm" appears in each user record. Tick this box to give the user the authority to control the alarm system.
The main display shows the tokens that are assigned to the user. Users can be assigned more than one token as required. Tokens can be added by either entering the card number manually OR by presenting or swiping the card at a desktop reader. Right clicking on the key icon allows this to be changed to the style of token issued.
Tokens can be deleted completely by pressing the 'Delete token' button.
- Lost token
If a token is marked as lost, it will be automatically invalid on all doors. If it is presented at any reader on the system, an alarm event will be generated. If a token that is marked as lost is then found, the token can be reinstated with the 'Found' button or can be deleted and the token issued to another user.
- Users » [User name] » Other details and Memo
Details can be entered for every user on the system. Default user detail fields are:
Address 1
Address 2
Town
County
Post code
Home telephone
Home fax
Mobile
Position
Start date
Car registration
Memo
The 16 user detail fields can be modified as required.
Note: Field names can be edited by double clicking on them (unless disabled in Options).
This tab displays the events for that user. This can be useful if trying to locate a user in a large building, simply go to the user record and see where they presented their card last. The events in this screen can be sorted by any of the columns by clicking the left mouse button over the column header.
This tab shows where the user is currently valid. The readers on which the user is currently valid will be highlighted; readers where the user is currently invalid will be greyed out.
Reset allows the users anti-passback status to be reset and their next valid access sets their location in the system.
By default, users must obey anti-passback rules; this can be deselected. This means that security staff, for instance, can always gain access through doors, which might otherwise have been barred. For example, when in pursuit of an unauthorised intruder, they might end up tailgating users through doors, and it would not be appropriate for them to then be barred from going through other doors. It is possible to right click on a department, go to properties, and then select or deselect all users in that department to obey anti-passback rules.
At All Secure, we are dedicated to delivering superior service; enabling our clients to trust us and recommend us to others.


